Because I'm a "what if" kind of person, I wondered what would happen if I combined my sourdough cookie recipe with my oatmeal cookie recipe. This is a quick recipe, if your starter is multiplying too fast in the fridge. Plenty to eat and give away.
Here are the ingredients I used:
1/2 pound of butter (2 sticks), softened (or butter powder, reconstituted)
3 large eggs (or 6 T. egg powder and 6 T. water)
1-1/2 c. brown sugar, packed
2 t. vanilla
2 t. baking soda
1 t. cinnamon
1/2 t. salt.
2 c. flour
1-1/2 c. sourdough starter
3 c. rolled oats
3/4 c. light raisins
3/4 c. dried cranberries
1/2 c. chopped dates
1 c. chocolate chips, favorite variety
This makes a sticky dough.
1. Cream the sugar, butter, eggs, salt, cinnamon, baking soda and vanilla.
2. Add the sourdough starter. Blend well.
3. Add the flour and blend well.
4. Add the chocolate chips and dried fruits and blend well.
5. Add the oats, one cup at a time, mixing as you go.
6. Drop by rounded spoonfuls on ungreased cookie sheet.
7. Bake at 350 for 12 minutes.
Cookie spreads a little, so I put 5 rows of 3 on my big Oneida cookie sheet, and only 3 rows of 3 on the smaller flat one with no sides and one end bends up a little. In case you have that kind.
They are still baking, so I'm not sure, but guessing 6 dozen cookies about 2.5-3". My cookies are generally oval because I don't round them nicely when I drop them. =) My first sample was delicious! I might cut the sugar down next time to 1 cup, because there is sugar in the sourdough starter, and they are sweeter than I usually make my cookies.
Tuesday, June 26, 2012
Friday, June 15, 2012
Sourdough Cookies
 I better post this recipe so I can sort of replicate it again! =) These cookies are so delicious, I have almost made myself sick with eating them warm from the oven. I don't even want to think about how many calories that is, but the good part is there isn't as much sugar as many cookies have. I used the Herman sourdough starter that lives in my fridge all the time. I'm going to put that recipe on the recipe page, because there are SO many things you can bake with this sourdough starter!
Ingredients:
1 c. starter
3 c. flour
1 t. baking soda
1/2 c. butter (1 stick, 1/4 lb.)
1-1/3 c. sugar
4 T. egg powder
1/2 c. water
3/4 c. dried cranberries
3/4 c. chopped dates
1. Preheat oven to 350.
2. Mix everything together, except flour. When it's well blended, add the flour. It will be a sticky dough, sort of halfway between bread and cookie dough.
3. Drop by rounded teaspoons on ungreased cookie sheet.
4. Bake 11-12 minutes.
Yield: 4 dozen cookies about 2.5" across.
Experimenting
Do you ever just experiment with recipes? With canning, I have to be exact on the canning directions, and if I want jelly or jam, I pretty much have to follow the recipe. You can't imagine how hard this is for me! Even my favorite oatmeal cookie recipe from Quaker gets messed with. I simply can't help the what if scenarios!
So it's no surprise that I messed with several recipes to come up with one for the peach-pineapple salsa. I didn't have fresh pineapple or peaches. I didn't have freeze-dried ones, either. So I went to the food storage to see if I had canned ones, and I did! Here's the recipe I came up with, and the salsa is fabulously good!
It is a sweet salsa, and not at all hot, because you can see there are no peppers in the recipe. If you want hot. Add one or two jalapeno peppers, or if you are crazy, try habanero peppers. If I'd had any orange or yellow bell peppers left after the sweet pepper salsa, I'd have added those, but I didn't so this is what I did.
Ingredients:
1 large can crushed pineapple, well drained
1 large can peach slices, well drained
30-35 medium tomatoes, skinned (a few were on the small side)
2 medium sweet onions (I used Vidalia, but Texas Sweets or whatever is available)
1/2 c. red wine vinegar
1/2 c. honey (I used Tennessee honey)
1 T. salt
1 t. favorite pepper (mine is a red/white/green/black combo)
garlic and cilantro to taste
1. Prepare your canner, jars and lids. Jars should be pre-heated in warm water in canner, lids should kept in simmering (not boiling) hot water, and screw bands should be room temp so you can handle them.
2. In large stainless steel or enamel soup pot (at least 6 quarts) combine peaches, pineapple and diced or chopped tomatoes. Small is not necessary, but slices are too big. Bring to a boil and back off heat a little so it simmers.
3. Add the rest of the ingredients and spices. Cook, stirring frequently, until it thickens. Do NOT put a lid on it! It will never boil down if the steam can't escape, so put the hood fan on and let it simmer. If it sticks to the bottom, do NOT scrape. You'll wind up with small burned bits. That's not a disaster, since you can pick them out later, but it's easier not to.
4. Depending on how well drained and how juicy the tomatoes, it will take 5 to 30 minutes, possibly longer, to get to salsa consistency. When it does, leave it simmering on the stove, and ladle salsa into jars, one at a time. It's very helpful to have the wide-mouth jar funnel that comes with most water bath canners, or can be bought in a set of utensils for canning. It keeps the mouth of the jar cleaner and keeps the salsa from spilling over the outside of the jar.
5. As you ladle into each jar, fill to within 1/2 inch of the top of the jar, then remove ladle and use a paper towel or old, soft towel to wipe the lid are which will come in contact with the sealing lid.
6. Get the sealing lid on quickly, and screw a ring on. Do NOT tighten too much. Just hand tighten the ring. It isn't there for eternity, just while canning and cooling. Then it can be removed, though it doesn't have to be.
7. Place jars in canner, either in a basket or on a rack that keeps them off the bottom of the pot. Something comes with a canner for this purpose. Make sure the jars are covered by at least an inch of water. Put the lid on and bring the pot to a boil. After it starts to boil, start timing. I did mine at 20 minutes, though 15 is often recommended for salsa recipes. However, some of the recipes had 20 minutes, and since I was winging it, I decided to be safe and make it 20.
8. Turn off heat, remove lid and let sit at least 5 minutes. I usually go for a little longer. If you have a basket that will sit on the side of the canner and not fall back in, then pull up the basket and let it sit to cool another 5 minutes.
9. Lay a towel out on your counter top. You do NOT want the hot jars to come in contact with the cooler counter top. Lift jars with a jar lifter to avoid burns. Try not to tilt the jars. Don't worry about water on top of the jar. It will evaporate, and if it doesn't, you can dry it later. Line jars up on toweling, with space around every jar.
10. Almost immediately, you should hear the lovely ping of sealing jars, one after another. Some people call it a pop, but it's a ping to me. =)
Leave the jars alone for 24 hours. Don't touch them, no matter how tempting. It may feel cool on the outside, and the inside is still warm.
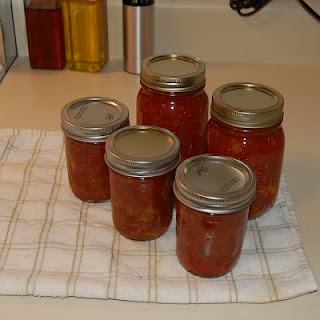
Yield: about 12 half-pints or 6 pints.
So it's no surprise that I messed with several recipes to come up with one for the peach-pineapple salsa. I didn't have fresh pineapple or peaches. I didn't have freeze-dried ones, either. So I went to the food storage to see if I had canned ones, and I did! Here's the recipe I came up with, and the salsa is fabulously good!
It is a sweet salsa, and not at all hot, because you can see there are no peppers in the recipe. If you want hot. Add one or two jalapeno peppers, or if you are crazy, try habanero peppers. If I'd had any orange or yellow bell peppers left after the sweet pepper salsa, I'd have added those, but I didn't so this is what I did.
Ingredients:
1 large can crushed pineapple, well drained
1 large can peach slices, well drained
30-35 medium tomatoes, skinned (a few were on the small side)
2 medium sweet onions (I used Vidalia, but Texas Sweets or whatever is available)
1/2 c. red wine vinegar
1/2 c. honey (I used Tennessee honey)
1 T. salt
1 t. favorite pepper (mine is a red/white/green/black combo)
garlic and cilantro to taste

1. Prepare your canner, jars and lids. Jars should be pre-heated in warm water in canner, lids should kept in simmering (not boiling) hot water, and screw bands should be room temp so you can handle them.
2. In large stainless steel or enamel soup pot (at least 6 quarts) combine peaches, pineapple and diced or chopped tomatoes. Small is not necessary, but slices are too big. Bring to a boil and back off heat a little so it simmers.
3. Add the rest of the ingredients and spices. Cook, stirring frequently, until it thickens. Do NOT put a lid on it! It will never boil down if the steam can't escape, so put the hood fan on and let it simmer. If it sticks to the bottom, do NOT scrape. You'll wind up with small burned bits. That's not a disaster, since you can pick them out later, but it's easier not to.
4. Depending on how well drained and how juicy the tomatoes, it will take 5 to 30 minutes, possibly longer, to get to salsa consistency. When it does, leave it simmering on the stove, and ladle salsa into jars, one at a time. It's very helpful to have the wide-mouth jar funnel that comes with most water bath canners, or can be bought in a set of utensils for canning. It keeps the mouth of the jar cleaner and keeps the salsa from spilling over the outside of the jar.
5. As you ladle into each jar, fill to within 1/2 inch of the top of the jar, then remove ladle and use a paper towel or old, soft towel to wipe the lid are which will come in contact with the sealing lid.
6. Get the sealing lid on quickly, and screw a ring on. Do NOT tighten too much. Just hand tighten the ring. It isn't there for eternity, just while canning and cooling. Then it can be removed, though it doesn't have to be.
7. Place jars in canner, either in a basket or on a rack that keeps them off the bottom of the pot. Something comes with a canner for this purpose. Make sure the jars are covered by at least an inch of water. Put the lid on and bring the pot to a boil. After it starts to boil, start timing. I did mine at 20 minutes, though 15 is often recommended for salsa recipes. However, some of the recipes had 20 minutes, and since I was winging it, I decided to be safe and make it 20.
8. Turn off heat, remove lid and let sit at least 5 minutes. I usually go for a little longer. If you have a basket that will sit on the side of the canner and not fall back in, then pull up the basket and let it sit to cool another 5 minutes.
9. Lay a towel out on your counter top. You do NOT want the hot jars to come in contact with the cooler counter top. Lift jars with a jar lifter to avoid burns. Try not to tilt the jars. Don't worry about water on top of the jar. It will evaporate, and if it doesn't, you can dry it later. Line jars up on toweling, with space around every jar.
10. Almost immediately, you should hear the lovely ping of sealing jars, one after another. Some people call it a pop, but it's a ping to me. =)
Leave the jars alone for 24 hours. Don't touch them, no matter how tempting. It may feel cool on the outside, and the inside is still warm.
Yield: about 12 half-pints or 6 pints.
Monday, June 11, 2012
Summer Harvest Benefits
My own tomatoes were started from plants and have been growing about six weeks on the back deck. There are a lot of 1-2 inch tomatoes that will come along in a while. A farm about an hour from here already has tomatoes harvested. I suspect greenhouse activity. =) Last weekend, a bunch of us went together and someone picked up our orders of 25 pound boxes of tomatoes. Thankfully, I only ordered one! I'm not able to work quite as hard as I used to and with half the box turned into salsa, I'm wiped out!
The first batch of salsa I made included 3 sweet banana peppers from my own back porch. Excitement! As I type this, I'm pausing to load tortilla chips with that salsa and it is so good! Even if I do say so myself. I modified a recipe given to me by a friend. I'm sharing it here. This recipe could be done using lots of the harvest from your own garden!

Sweet Pepper Salsa
Makes 4.5 pints
30-35 tomatoes (mine were small and medium sized)
3 sweet banana peppers (about 5 inches long)
1 each red, yellow and orange bell peppers
2 large sweet onions (Vidalia or Texas Sweets are excellent!)
3 teaspoons salt (I used two sodium and 1 potassium)
1 teaspoon pepper (I used a red/white/green/black combo in my grinder)
1/2 c. sugar (if you like it sweeter, use up to a cup, but no more)
garlic to taste (I could have used fresh, but didn't have any so I used a teaspoon of garlic powder.)
1 teaspoon of cilantro (or to taste, could be fresh)
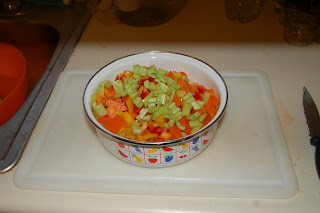
I think that's everything. I used the directions in the Ball Canning book for blanching the tomatoes (though I don't do it until the skin cracks because I hate truly mushy stuff!). I mixed all the chopped up things, put in the spices, and boiled it a while. (How do you like those directions?) I think I let it simmer, not full rolling boil, for about an hour or an hour and a half, and it all fit in my 6 qt. Wearever pot.
My tomatoes were very, VERY juicy, so I skimmed off about a liter of thin juice from the top. I will use it in canning the tomatoes tomorrow, I think, or else put it in a soup pot soon. It has all the flavors, but it was more like watery juice and I figured it would take forever to boil away.
I ladled the salsa into 4 pint jars and the left over bit into a half-pint that I put in the fridge. The pint jars were water-bath canned for 20 minutes and they all pinged beautifully.
I have peach-pineapple-tomato salsa in the pot now and will soon get it into jars for the water bath, and then tomorrow finish the rest of the tomatoes as quarters canned.
So how does this fit into Provident Prep? Well, it's simple really. Having a garden or having access to summer-priced produce gives us the opportunity to preserve, whether by canning, dehydrating, making into jam, or freezing, things that will be delicious in the dead of winter and healthy for us and our families.
Tuesday, June 5, 2012
First Aid Kit
Do you have your 3-day disaster kit ready in case of emergency? Do you know where it is? =) Is there enough for each member of your family?
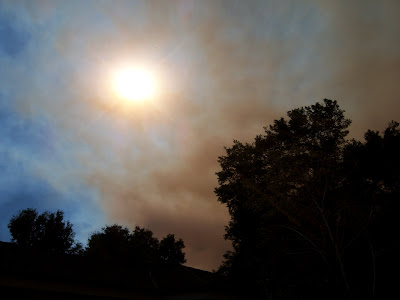
These are questions I had to think about when I attended two Emergency Preparedness fairs in this last year. I've worked hard on food storage, and I'm doing okay there, though it isn't complete, but there are a lot of other things to think about. A disaster could be a tornado (such as hit in Chattanooga a few months ago) or a flood (which we had in low areas of East Tennessee in the last few months), or maybe a hurricane or earthquake, if you live in areas prone to those things. It could be a forest fire like the one that raged behind my friend's California home in 2007:
The last post I did on this, in May, had very long lists of things that could be helpful. Most of the time, 3 days is the most we have to be away, but sometimes, it will be more. Still, if we are prepared with a 72-hour "bug-out" bag for each family member, we'll be in better shape than most people evacuating. So what should be in it? This is the light version.
I suggest starting with a backpack the size each family member can carry. Mom and Dad may have to carry extras for little ones, but you can figure that part out on your own.
Include:
In case you don't have to evacuate, but there are other issues, find out where your gas, electric and water shut-offs are to the house. Have the proper tools available for getting those shut off. It could save your life and/or your house.
These are questions I had to think about when I attended two Emergency Preparedness fairs in this last year. I've worked hard on food storage, and I'm doing okay there, though it isn't complete, but there are a lot of other things to think about. A disaster could be a tornado (such as hit in Chattanooga a few months ago) or a flood (which we had in low areas of East Tennessee in the last few months), or maybe a hurricane or earthquake, if you live in areas prone to those things. It could be a forest fire like the one that raged behind my friend's California home in 2007:

The last post I did on this, in May, had very long lists of things that could be helpful. Most of the time, 3 days is the most we have to be away, but sometimes, it will be more. Still, if we are prepared with a 72-hour "bug-out" bag for each family member, we'll be in better shape than most people evacuating. So what should be in it? This is the light version.
I suggest starting with a backpack the size each family member can carry. Mom and Dad may have to carry extras for little ones, but you can figure that part out on your own.
Include:
- Towels, blankets and sleeping bags (there are some very compact sizes of things that will work just fine for the blankets and sleeping bags, thanks to the space program)
- Battery powered radio - and batteries for it! You want one with the NOAA stations which broadcast updates from the National Oceanic and Atmospheric Association. redcrossstore.org has a good one for about $35
- Sanitary supplies - I suggest wet ones or baby wipes. Toilet paper and female needs should be included, too.
- Paperwork - photocopies, not originals, of passports, insurance papers and legal papers, including in-case-of legal papers
- Extra cash - about $150-200, but don't have it all in twenties! Have a lot of small bills and at least $5 in change. People aren't going to give change in an emergency! Leave this cash in your kit at all times, in a hidden pocket or maybe in a box of bandaids.
- Water - you're going to need a gallon per person per day, and you can't carry that. Have at least one 20 oz. bottle in your backpack, but have a 24-pack of bottles you can grab if you have to evacuate in your car, and maybe a water-filtration system if you are lucky enough to be where there is water that could be cleaned that way.
- First-aid kit - check the red cross store again, or other preparedness centers. Don't forget any medications you have to take every day. For safety, keep at least a week's supply and change it every year. Don't forget contact lenses!
- Clothing - this could be old clothes you planned to donate, but be sure there are extra socks and comfortable shoes. Foot injuries are the most common injuries in disasters!
- Food - Non-perishable items and lightweight, things that can be eaten without cooking, i.e., energy bars, pop-top canned foods, high-nutrition drinks in boxes. Check your local dollar store for inexpensive snacks and things that would provide energy and nutrition, both. Don't forget the family pet!
- Maps of your area - that smartphone will run out of energy, or the system could be unavailable!
- Clorox wipes - great for disinfecting surfaces
- Necessities such as flashlights (and I suggest the small wind-up flashlights - a few seconds of turning gets you an hour of light! about $5) matches, one of those all-purpose Winchester or Leatherman tools with knives, saws, pliers, etc. that pull out, sunscreen, extra car and house keys, travel cell phone charger - car and wall, if possible.
In case you don't have to evacuate, but there are other issues, find out where your gas, electric and water shut-offs are to the house. Have the proper tools available for getting those shut off. It could save your life and/or your house.
Subscribe to:
Posts (Atom)